Medical Micro pigmentation Treatment 640x640 1

What Shall I Do Before Receiving My Medical Micro-pigmentation Treatment?

In most medical micro-pigmentation tattooing procedures skin tone colour matching must be carried out prior to the treatment and a period of 4-6 weeks must pass before the true colour reveals itself. Your specialist will advise you, as it depends on the area treated.

A sensitivity patch test must be performed prior to the medical micro-pigmentation procedure.

It is essential that you are not tanned when the skin tone colour match takes place and you do not tan during the course of the treatment plan.

Medical micro-pigmentation procedures normally require multiple application sessions. A waiting period of 4 – 6 weeks must be allowed to permit the skin to heal fully between sessions.

Be prepared for the colour intensity to be significantly sharper and darker immediately after the procedure. This will subside and become softer as the skin heals. This process can take up to a few days.

areola tattoo reconstruction hertfordshire

There may be swelling, very rarely bruising and redness following each treatment session. You may want to avoid social events.

Do not take aspirin or anti-inflammatory medication such as Ibuprofen 2 days prior to each treatment session.

Do not discontinue any prescribed medication before consulting your doctor.

Avoid alcohol intake to a minimum of 2 days prior to and after each treatment session. Alcohol dilutes the blood and can be responsible for bruising.

Infections can occur if you do not adhere to the aftercare instructions. You must keep the area clean and medicated during the healing period as per the aftercare instruction sheet that you will be given by your specialist.

Do not use Retin A retinol skincare products close to the area to be treated for 6 weeks prior to your procedure.

Do not use AHA skincare products close to the area to be treated for 4 weeks before your procedure.

Avoid professional chemical peels close to the procedure site for 4 weeks before your procedure.

Please be aware that the National Blood Service does not accept donations of blood for 12 months after a medical micro-pigmentation procedure.

Medical Cleft Lip tattoo

If you have a history of cold sores (herpes simplex) and are scheduling a lip tattooing we advise you to use anti-herpes medication for 1 week prior and 1 week after your medical tattooing. This can help minimise an outbreak. The procedure does not cause cold sores, however, if you carry the virus, it lays dormant in the nervous system and can be aroused by the infusion process.

IPL laser hair removal should be performed at least 2 weeks before your medical tattooing.

Lip wax or bleaching treatments should not be undertaken for two weeks prior to and after your cosmetic tattoo.

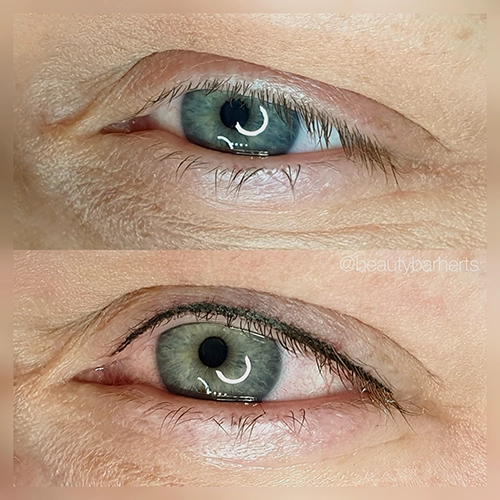
How to look after your semi permanent Eyeliner tattoo 640x640 1

How to look after your semi-permanent Eyeliner tattoo?

Proper care following your eyeliner tattooing is necessary to achieve the best results. 

You may experience the following symptoms for 4 days after you had your semi-permanent eyeliner tattoo done:

Minor redness, rarely bruising, swelling and tenderness of the eyelids. Eyelashes that stick together, particularly overnight. Dryness and itchiness in the treated area. 

These symptoms are a normal part of the healing process.

For the first 2 days after your eyeliner tattoo:

  • Disposable cold packs may be applied as necessary to reduce any swelling
  • Daily care to follow for 7 days after eyeliner pigmentation
  • Apply either a healing balm or bepanthen cream a minimum of 3 times a day, using a cotton bud. Wash your hands before applying the product and prevent cross-contamination of the product by using a clean cotton bud for each eye.
  • You may wish to use an antibiotic eye cream obtained from a chemist to prevent eye infections during the healing process. Your chemist will advise you how to use it.
  • We recommend that you use a gentle facial cleanser to freshen your skin during the first week. Do not splash wash your face. Do however clean your enhancement twice daily with damp cotton pads.
  • If your enhancement gets wet, gently pat the area dry using a clean tissue.
  • Keep your hair away from your enhancement to prevent the possibility of infection.
  • Some itching is normal. DO NOT PICK, PEEL OR RUB your enhancement as the colour may heal unevenly and you could risk infection, which in turn could lead to scarring. Allow the colour to flake away by itself.
  • Do not wear contact lenses for 24 hours.
  • Use your normal eye cream sparingly taking care to ensure it is not applied directly over your new eyeliner tattoo.
  • Use sunglasses to protect your eyes from wind and pollution.
  • Do not receive skincare beauty treatments for 5 days after the application of your eyeliner.
  • No make-up should be applied close to your eyeliner for 3 days. New mascara must be used after the 3 days (there may be some bacteria present in your old mascara).

Avoid for 2 weeks

Do not expose your eyeliner to direct sun, tanning treatments, Jacuzzis, saunas, saltwater, chlorinated pools and direct shower spray. Do not receive eyelash tinting, permanent curling or any artificial eyelash treatments. Do not use lash growth products.

Important notes

Loss of some eyelashes during the healing process is a possibility but happens very rarely. Lost eyelashes will normally grow back within 4 months. Remember, your selected colour will be stronger and more sharply defined for 5 to 7 days after application but as the healing process occurs the colour will soften and lighten.

The approximate healing period is 14 days, however, healing can be prolonged if your immune system is compromised if you are generally stressed and by poor diet.

Keep in mind that in many cases, some unevenness of colour is to be expected. This is the purpose of the top-up visit allowing us to fine-tune your tattooed eyeliner. 

eyeliner latino thick

Long term care

If you are planning eye surgery or an MRI scan, please inform your doctor of your micro-pigmentation eyeliner.

Please inform the National Blood Service if you donate blood, as you may not be eligible to give blood for 4 months post-application.


Aftercare for semi permanent Lip tattoo 3 640x640 1

Aftercare for semi-permanent Lip tattoo

Proper care following your semi-permanent lip tattooing is necessary to achieve the best results. 

You may experience the following symptoms for 4 days after lip tattoo treatment

  • Swelling and redness. 
  • Tenderness.
  • Flaking and mild itchiness as the lips heal. 
  • Dry skin may remain for up to 2 weeks. 
  •  These symptoms are a normal part of the healing process.

For the first 2 days after your lip liner, lip blush or full lip tint treatments;

Disposable cold packs may be applied as necessary to reduce any swelling.

Daily Care to follow for 7 days

 Apply a healing balm regularly using a cotton bud. Wash your hands before applying the product and prevent cross-contamination of the product by not replacing the used bud into the container.

We recommend that you use a gentle facial cleanser to freshen your skin during the first week. Do not splash wash your face. Do however clean your enhancement twice daily with damp cotton pads.

Apply a layer of Vaseline to your semi-permanent lips when brushing your teeth to prevent it from becoming wet. Remove the Vaseline with damp cotton pads.

If your lip tattoo gets wet, gently pat the area dry using a clean tissue.

Some itching is normal. DO NOT PICK, PEEL OR RUB your lips as the colour may heal unevenly and you could risk infection, which in turn could lead to scarring. 

Allow the colour to flake away by itself.

No make-up should be applied close to your lip area for 3 days.

Avoid eating spicy and salty foods and drink through a straw for 3 days.

No kissing for 5 days to prevent infection 

Do not receive skincare beauty treatments for 5 days after the application of your lip tattoo.

Aftercare for semi-permanent Lip tattoo

Avoid For 2 Weeks

  • Do not expose your lips to direct sun, tanning treatments, Jacuzzis, saunas, saltwater, chlorinated pools and direct shower spray.
  • Do not receive bleaching, waxing, electrolysis or laser hair removal treatments close to your lips.
  • Do not use lip plump products
  • Do not receive lip filler treatments

Important Notes

If you suffer from cold sores at present or anytime in the past use an anti-herpes medication 5 times daily for 1 week. If an outbreak does occur it will generally begin on day 3 of the healing process.

Remember, your selected colour will be stronger and more sharply defined for 4 – 5 days and will then shed away appearing as if little or no colour is present. Over the next 3 weeks, the colour will blossom into a considerably softer version of the original colour. 

The approximate healing period is 14 days, however, healing can be prolonged if your immune system is compromised if you are generally stressed and by poor diet.

Keep in mind that in many cases, some unevenness of colour is to be expected. This is the purpose of the top-up visit allowing us to fine-tune your lip tattoo. 

Aftercare for semi-permanent Lip tattoo

Long Term Care

Use a good sunscreen. Sun exposure will fade your micro-pigmentation enhancement. If you are planning a chemical peel, laser or IPL on your face or an MRI scan, please inform the technician of your micro-pigmentation enhancement.

Please inform the National Blood Service if you donate blood, as you may not be eligible to give blood for 4 months post-application.


ombre eyebrows hertfordshire 640x640 1

How do you take care of newly tattooed or microbladed eyebrows?

Proper care following your semi-permanent eyebrow treatment is necessary to achieve the best results.

You may experience the following symptoms for 1- 4 days

  • Minor swelling and redness.
  • Mild tenderness.
  • Itchiness in the eyebrow area.
  • Dry flaking skin.

These symptoms are a normal part of the healing process, and should not be a reason to worry.

Daily care to follow for 7 days after semi-permanent eyebrow treatment:

Apply a very thin layer of bepanthen cream a minimum of 3 times a day, always using a new and clean cotton bud.

Wash your hands before application of the product and prevent cross-contamination of the product by using a clean cotton bud for each eyebrow, and each time you touch the nozzle of the cream.
We recommend that you use a gentle soap to freshen your skin during the first week. Do not splash wash your face. Do however clean your eyebrow tattoo a few times a day with damp cotton pads, always before applying a new layer of the healing balm/cream.

Apply a thick layer of Vaseline to your new semi-permanent brows only when showering or washing your hair to prevent it from becoming wet. Remove the Vaseline with damp cotton pads properly until your skin is clean from the product. Please do not use Vaseline to moisturise, only as a barrier when washing or showering.
If your eyebrows get wet, gently pat the area dry using a clean tissue.

Keep your hair away from your eyebrows to prevent the possibility of infection (your hair can have bacteria on them).

Some itching is normal. DO NOT PICK, PEEL OR RUB your eyebrows as the colour may heal unevenly and you could risk infection, which in turn could lead to scarring. Allow the colour to flake away by itself.

Do not receive skincare beauty treatments for 14 days after the application of your semi-permanent brows.
No make-up should be applied close to your eyebrows for 5 days.

eyebrow tattoo soft ombre

Avoid for 4 weeks

Do not expose your semi-permanent brows to direct sun, tanning treatments, Jacuzzis, saunas, salt-water, chlorinated pools and direct shower spray.
Do not receive eyebrow tinting, waxing, electrolysis or laser hair removal treatments close to the brow region.

Important notes

Remember, your selected colour will be slightly stronger and more sharply defined for a few days after application but as the healing process occurs the colour will soften and lighten.
The approximate healing period is 14 days, however, healing can be prolonged if your immune system is compromised if you are generally stressed and by poor diet. The skin will heal properly in 4-6 weeks. Your new brows and the area around will look normal and healed to the naked eye, when we say healing process, we mean inside of the skin that isn’t visible from outside. You will be able to wear your usual makeup after 4-5 days.

Keep in mind that in some cases, unevenness of colour can be expected. This is the purpose of the touch-up visit allowing us to fine-tune your new lovely eyebrows.

Long term care

Use a good sunscreen. Sun exposure will fade your micro-pigmentation enhancement.

If you are planning a chemical peel, laser procedure or an MRI scan, please inform the technician of your micro-pigmentation treatment.

Please inform the National Blood Service if you donate blood, as you may not be eligible to give blood for 4 months post-application.

What Shall I Do Before getting semi permanent makeup treatment 640x640 1

What Shall I Do Before getting semi-permanent makeup treatment?

Prior to your semi-permanent makeup procedure think about the look that you wish to achieve. 

As experts in the field of semi-permanent makeup and cosmetic tattoo makeovers, we ensure that the correct colours and styles are chosen for you, however, you are part of the decision-making process. 

Micro-pigmentation enhancements usually require multiple application sessions. To achieve the best results you may be required to return for a complimentary touch-up procedure between 4 and 6 weeks after the initial treatment.

Be prepared for the colour intensity to be slightly sharper and darker immediately after the procedure. This will subside and become softer as the skin heals. This process can take up to a few days, but you will be able to return to work and your daily activities on the day after your treatment.


General Cosmetic Tattoo Pre Advice

  • Since delicate skin or sensitive areas (like eyelids after an eyeliner tattoo) may be swollen or a little red, you are advised not to make social plans on the day of your enhancement.
  • If applicable please wear your normal make-up to your enhancement appointment, but be prepared to have it removed in the treated area.
  • Do not take aspirin or anti-inflammatory medication such as Ibuprofen 2 days prior to your semi-permanent makeup appointment.
  • Do not discontinue any medication before consulting your doctor.
  • Do not drink alcohol 2 days before your enhancement.
  • Do not use 1% Retin A skincare products close to the area to be treated for 6 weeks prior to your procedure. 
  • Do not use AHA skincare products close to the area to be treated for 4 weeks before your procedure. 
  • Avoid professional chemical peels close to the procedure site for 6 weeks prior to your procedure.
  • Please be aware that the National Blood Service does not accept donations of blood for 4 months after micro-pigmentation and semi-permanent makeup tattoo.


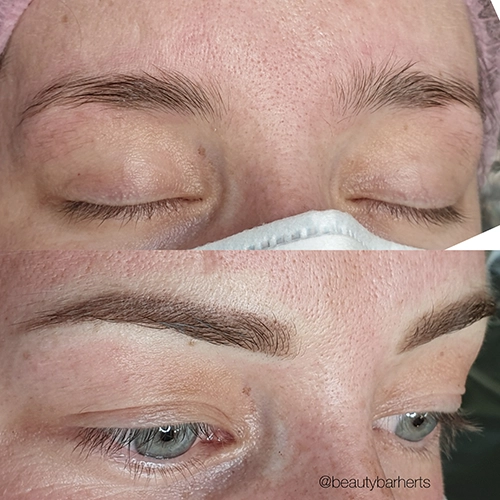
brows before after


Semi-permanent Eyebrow tattooing

  • Waxing and threading treatments should be performed no less than 1 week before your procedure.
  • IPL laser hair removal should be performed no less than 2 weeks prior to your procedure.
  • Electrolysis treatments should be performed no less than 2 weeks prior to your procedure.
  • Eyebrow tinting should be performed no less than 2 weeks prior to your procedure.
  • Eyebrow hair stimulating products and growth serums should not be used for 4 weeks before your procedure.
  • Botox in the brow region should be performed no less than 2 weeks pre-procedure.


Semi-permanent Eyeliner tattooing

  • Eyelash tinting or eyelash perming treatments should be carried out no less than 2 weeks before your procedure.
  • Eyelash stimulating products and growth serums should not be used for 6 weeks prior to your procedure.
  • Artificial lashes should be removed 1 week before your procedure and not reapplied for 2 weeks post-procedure.
  • Do not wear contact lenses during or immediately following your procedure. Remember to bring your glasses. You may resume wearing your contact lenses 24 hours after the procedure.
  • You may have mild swelling after your micro-pigmentation procedure and as a safety precaution, you may wish to have someone drive you home.


classic thick eyeliner


Semi-permanent Lip Tattooing

  • If you have a history of cold sores (herpes simplex virus) and are scheduling a lip tattoo we advise you to use anti-herpes medication, for example, Zovirax ointment that can be obtained from a chemist. Use the medication 1-week prior and 1-week after your micro-pigmentation treatment 5 times a day to reduce the incidence of an outbreak by 50%.
  • Oral anti-herpes medication (available on prescription) will control the incidence of an outbreak more or less completely. Micro-pigmentation does not cause cold sores, however, if you carry the virus, it lays dormant in the nervous system and can be aroused by the infusion process.
  • IPL laser hair removal around the mouth should be carried out no less than 2 weeks prior to your procedure.
  • Waxing and bleaching treatments should be performed no less than 2 weeks prior to your procedure.
  • Electrolysis treatments should be performed no less than 2 weeks prior to your procedure.
  • Dermal fillers in the lip should be performed after your procedure.


lash extensions training course 640x640 1

What makes our lash extensions training course better than other training classes?

Individual eyelash extensions training academy and salon

A nice and pleasant atmosphere.
We are just normal people During our eyelash extensions training courses we have an easy and relaxed atmosphere, where everyone can ask questions, drink their teas or coffees. Time passes quickly as our students are always happy and at ease.

Discount

Soon we are opening our eyelash extensions shop, where students will be able to buy all the professional lash products, they will need for the lash application. Our students will receive an exclusive discount when they shop in our store.

Professional eyelash extensions certificate/Diploma

Our individual lash training courses are fully accredited and insured. Once you have qualified you will receive a diploma of completion (not attendance) of the training course, giving you the title of an eyelash extensions technician. Our diploma is fully recognised by different insurance companies.

become lash  technician

Pictures and portfolio

We will show you how to photograph your new sets of eyelash extensions so they look nice and pleasing and attractive to your new clients. You will also receive pictures from your training session, so you can start your lash portfolio

Models and workplace

Each of our students will have their own workspace and own lash model to work on, just for yourself. We don’t believe in students working on each other. You came here to learn, and you will spend all your time here doing so.

Your own eyelash extensions kit and tools

Each student will receive their own eyelash extensions kit. It contains lashes in different lengths, two pairs of tweezers, high-quality fast bonding glue, primer, remover, face masks, under-eye pads, tape, mascara wands, glue rings, training sponge, micro brushes and a manual that we wrote especially for our students. This kit will allow you to practice on your models, finish your case studies and there will be still plenty of lashes and glue left for you to use on your clients. During the training, you will have access to our fully equipped lash stations and professional lighting. You will be able to test different equipment to decide which ones you like best.

We keep up our training program

When you choose our training course, you can rest assure we will cover the whole program of the training course, and we will not leave you guessing how certain procedures are done.

Help is available after your lash extensions training course

We know how hard it can be at the beginning, that’s why we offer continuous support for our students. If you have any questions after your training we are available to help you. Send us your questions or pictures through WhatsApp and we will help with your queries.

Eyelash extensions training courses on weekends

As we understand that everyone has a busy life, we run our training courses on Sundays. You will not need to take time off work, find an expensive babysitter to look after your kids or drive through heavy traffic to come to us. Also, as it’s a Sunday, parking is free

qualify in lashes

Professional lash extensions trainers

Our students are trained by a professional and fully accredited eyelash extensions trainer and educator. Our lash extension trainer also applies lashes every day in the salon, so their knowledge is up to date with the latest trends and techniques.

Small training groups

We do not believe that you can learn properly in a class with a lot of students. We keep our groups small and we have no more than 3 to 4 students during our training sessions. This way we can pay attention to every individual trainee, and address their problems individually.

Split payments

We offer our students to split their payment. There’s a £50 booking fee that is required to secure your space, but the remaining amount does not need to be paid until 14 days before the training date.

Eyelash extensions manual

After your training day, you can keep your manual and take it home with you. This way you can always refer back to it for step by step application or any other important information like client’s record-keeping etc

If you have any questions please do not hesitate to contact us at info@beauty-bar.co.uk

eyelash extensions training course 640x640 1

Where can I find an eyelash extensions training course in Hertfordshire and Essex?

Eyelash extensions are getting more and more popular. But still, there is a lot of not very well-trained technicians who offer this treatment. Clients then complain that they have visible bits of glue on their lash extensions, that their new lashes are not very comfortable to wear, and the most important, that their natural lashes have been damaged by not a proper application of the eyelash extensions.

Sadly, with very low regulations there is plenty of places that offer eyelash extensions training courses, but are they teaching their students to apply nice, clean and healthy sets of eyelash extensions? Unfortunately, they do not.

lash classes

We meet so many girls who tell us stories how they trained with one or another lash extensions training school, but after a half-day short course that was rushed, and where they applied lashes on each other for about 30 minutes, they really have no confidence to even try the lash application on models or even friends.

Our lash training takes a whole intensive day, and we also give ongoing support to our students. They can always send us pictures and questions after the training is finished, asking for advice and tips on either practical application or theory, insurance, etc.

We guide our students until they reach required level of skill to become a lash technician, and only then they are awarded a fully accredited diploma which allows them to practice the individual eyelash extensions application giving them a title of eyelash extensions technician, (this is not only a diploma of attendance to the lash training course).

lash training

Our training courses are fully accredited, and our students will receive a 10% off CODE towards their first year of insurance, which will allow them to practice the trade.

For complete beginners, we advise starting with a classic individual one to one lash application. Our classic foundation training for beginners is designed to teach all the fundamentals of the lash extensions application, starting from:
– The very important part which is health and safety, lash growth and cycle and hygiene plus proper preparation and aftercare.
– Then we will move to eyelash extensions theory. We will cover all topics from what is the lash glue, how to use it and how to get best retention to types of lashes, lash mapping and how to apply lashes to enhance clients natural beauty (our eye shapes are different, so we need to style them differently, what suits one person may not look nice on another, and we show our students how to choose the right shape of eyelashes to make everyone look fab ), as well as removal, and the lash maintenance and infills.
– Students then can observe the trainer prepare and apply lashes on the live model.
– And, of course, the last step will be for students to practice the preparation and application of the lash extensions on a live model.

Our training courses are run in very small groups only, of no more than 3 to 4 students. This way we can support everyone at the training and give our lash students personalised support.

All of our students receive a student’s lash extensions kit worth of £100 and a printed out manual, so they can refer back to it at any time.

How to choose the best eyelash extensions glue 640x640 1

How to choose the best eyelash extensions glue?

Choosing the best lash extensions glue is not easy

How the glue works depend on weather conditions and humidity.

The most important part is the speed of your work. If you work quite quickly, you would prefer a faster-working glue. A faster glue would be one that bonds in 0.5 to 1 second.

If you work slower and you need more time to attach and position a lash extension in the correct direction, you may want to look for a slower bonding glue. Ideal glue for someone who does not work as fast will bond in 2 to 3 seconds.

We should take temperature and humidity under consideration too.

If you work in a place with higher humidity, anything above 50%, your glue will work faster anyway. Higher the humidity, the faster your glue will work. So on a rainy day, your 2-second glue will bond in 1.5 seconds to 1 second 🙂

You can expect your glue to work best in humidity between 45-55% and temperature between 20-22’C.

You may also notice that you will need to pick up a little bit more glue when the temperature gets higher.

A few more things you need to remember when using your lash glue

Do not store an open bottle of glue in a fridge. Low temperature and high humidity will cause it to set in the bottle, and making the glue useless.

Before each use shake the glue vigorously for at least 10-20 seconds.
After each time you use the glue, wipe off the nozzle of the glue bottle properly, to avoid the screw top getting permanently glued to the nozzle.

Use a new drop of the glue every 20-30 minutes.
If the lash glue cured very fast, it will leave a white residue on the surface. This is called blooming and does not affect the bonding effectiveness of the glue.

How to remove eyelash extensions 640x640 1

How to remove eyelash extensions?

If applied properly eyelash extensions look very nice and are very comfortable to wear. You should never feel them on your eyelids. If they are painful or not very comfortable, that is not how they supposed to feel. That may be a sign that your set of lashes was not applied correctly, the natural lashes were not properly separated, or too much lash glue was used. That could be a feeling when the too heavy lash extensions were attached, and they feel too stiff and plasticky.

remove eyelash extensions

Lash extensions are great if you don’t have much time to apply make-up, also when you regularly visit a gym or just want to sleep longer in the morning. Some women wear lash extensions all the time and have them infilled every few weeks, where other ladies only get the lashes applied for special occasions or holidays.

eyelash extensions removal

These women may let them fall out naturally, or decide to have a removal of eyelash extensions.

Please do not try to remove your eyelash extensions at home.

To remove eyelash extensions it’s best to book an appointment with an eyelash extensions technician.
This way you can be sure, that your natural lashes will not get damaged during the removal process. To remove eyelash extensions, the technician will use a special remover. The lash remover can be in the form of a liquid, gel, or cream. All of them are equally efficient in removing the lashes quickly and to dissolve the glue properly. During the removal you will have your eyes closed, the technician will apply the solution directly onto the eyelashes, and leave it there for a maximum of 5 minutes. Then they will wipe the solution off, after removing the eyelash extensions with tweezers first. Your eyelashes then will be washed and dried to finish the treatment.

can i apply mascara on eyelash extensions 640x640 1

Can I apply mascara to eyelash extensions?

Applying mascara to eyelash extensions

These days many women decide to treat themselves to eyelash extensions. Lash extension treatment gives you the longer, darker, and more appealing lashes. One of the main benefits includes the fact, that women who had it done, may completely forget about using mascara. Many ladies even stop wearing eye makeup altogether, as the lash extensions if applied properly will optically open up and lift the eyes.

eyelash extensions and mascara

Individual eyelash extensions should not have any mascara applied to them for hygiene reasons. It will be very difficult, if not impossible to remove it later. Eyelash extensions come in different lengths, and thicknesses. If you feel that they look too short and they may need some mascara, it’s best to ask your lash technician to attach longer lashes rather than applying mascara to your new eyelash extensions. If you would like to wear mascara on your extensions because they seem too sparse, or not full enough, you may ask for a fuller set of lashes, like a 3D or 6D russian volume set of lashes.

How should you look after your individual lash extensions?

For the first 24 hours avoid contact with water, and for the first 48 hours avoid steam and heat near the lashes.
It is also not advised to receive any face treatments during the first 48 hours, like facials.

To remove makeup in the eye area, you shouldn’t use any oily products or makeup removers that contain oils. Oils can weaken the lash glue.

mascara on eyelash extensions

After the 24 hours, you should start paying attention to cleaning your lashes daily.
Your new lash extensions should be washed daily with a soft bristle brush, and a foaming lash wash.
This will remove oils, grease, sweat, pollution, dead skin cells, remains of different cosmetics and various debris.

After washing the lashes you should dry them up, ideally with a kitchen towel, as it doesn’t produce any lint. Then your extensions should be brushed with a clean mascara brush.